
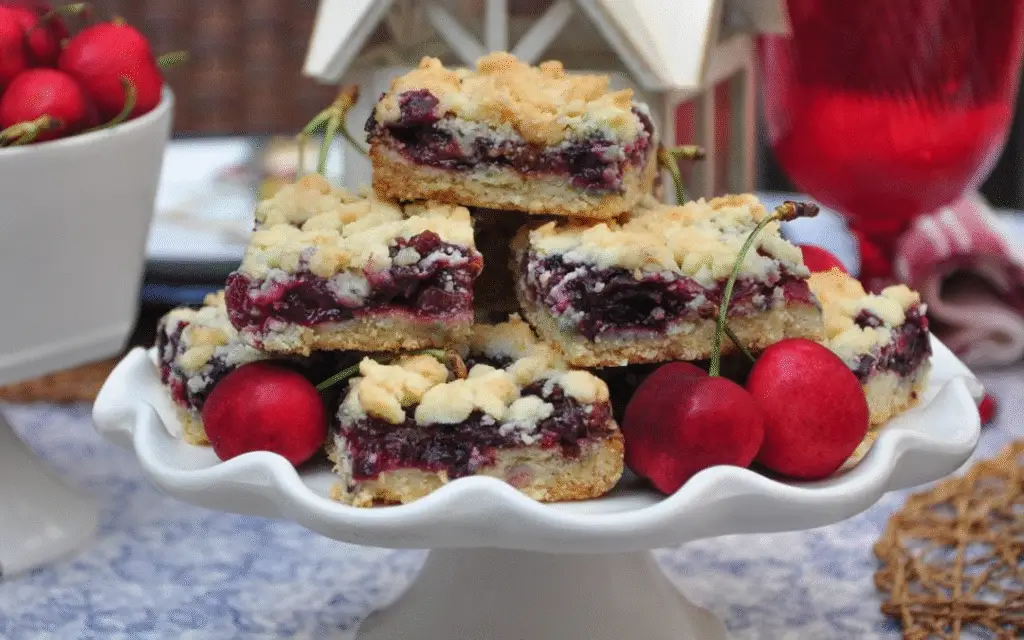
When cherry season is in full swing, there’s no better way to celebrate than with a tray of Cherry Crumb Bars.
These bars combine three irresistible layers: a buttery shortbread crust, a sweet and juicy cherry filling, and a golden crumb topping that’s crisp in all the right ways.
Unlike cherry pie, which can be a bit fussy, these bars are straightforward, travel well, and are easy to cut into squares for sharing.
Whether you enjoy them chilled straight from the fridge, warm with a scoop of vanilla ice cream, or simply alongside a cup of coffee, these crumb bars are guaranteed to become a summer favorite.
The best part? The crust and topping come from the same mixture, which saves time and keeps the recipe delightfully simple.
My Opinion
I love these bars because they highlight the natural sweetness of cherries without overpowering them.
The shortbread base is buttery and slightly crisp, creating the perfect foundation for the juicy cherry layer.
The crumb topping adds a little crunch, giving you that “pie-like” bite without all the effort of rolling dough.
Personally, I like to make them with fresh sweet cherries, but they’re also delicious with tart cherries if you prefer a little tang.
The balance of textures—tender, juicy fruit with crisp, buttery crumbs—makes them hard to resist.
Why You’ll Love This Recipe
- Easy to Make – No complicated steps or fancy tools required.
- Showcases Fresh Cherries – Simple ingredients let the fruit shine.
- Perfect Texture – Buttery shortbread, juicy filling, and crisp topping.
- Portable – Great for picnics, potlucks, or lunchbox treats.
- Versatile – Works with sweet or sour cherries.
Ingredients
For the Cherry Filling:
- 2 cups fresh cherries, pitted and chopped (about 1 lb / 450 g)
- 1 tablespoon granulated sugar (or 3 tablespoons if using sour cherries)
- 2 tablespoons cornstarch
- 1 tablespoon lemon juice
For the Shortbread Base & Crumb Topping:
- 1 3/4 cups all-purpose flour
- 2/3 cup granulated sugar
- 3 tablespoons cornstarch
- 1/4 teaspoon salt
- 3/4 cup unsalted butter, melted
- 1 tablespoon brown sugar (for topping only)
Ingredient Notes
- Cherries – Fresh is best, but frozen cherries (thawed and drained) also work.
- Butter – Use unsalted for better flavor control. Melt it gently to avoid scorching.
- Cornstarch – Essential for thickening the cherry filling so it sets properly.
- Brown Sugar – Adds extra crunch and caramel-like flavor to the topping.
Step-by-Step Instructions
1. Preheat the Oven & Prepare the Pan
Preheat your oven to 350°F (175°C). Grease an 8×8-inch (or 9×9-inch) baking pan and line it with parchment paper, leaving some overhang on the sides. This will make it much easier to lift the bars out later for clean slicing.
2. Make the Cherry Filling
In a medium bowl, combine 2 cups chopped cherries, 1 tablespoon sugar, 2 tablespoons cornstarch, and 1 tablespoon lemon juice. Stir until all the cherries are evenly coated. The cornstarch will absorb the juices during baking, creating a jammy texture instead of a runny mess.
💡 Tip: If your cherries are very juicy, give them a quick pat with a paper towel after chopping to reduce excess liquid.
3. Mix the Shortbread Dough
In a large bowl, whisk together 1 3/4 cups flour, 2/3 cup sugar, 3 tablespoons cornstarch, and 1/4 teaspoon salt. Pour in the 3/4 cup melted butter and stir until the mixture looks crumbly and slightly sandy. Don’t worry if it seems dry—this is exactly how it should be.
💡 Butter Tip: When melting butter in the microwave, heat in short bursts and stop when it’s mostly melted. Stir to let the residual heat melt the rest. This prevents splattering and keeps the butter from becoming too hot.
4. Bake the Base
Take about 2/3 of the crumb mixture and press it firmly into the bottom of your prepared pan. Use the back of a spoon or the bottom of a glass to flatten it evenly. Bake for 15 minutes, or until the edges start turning light golden. This pre-bake step helps create a sturdy crust that won’t get soggy from the cherry filling.
5. Prepare the Crumb Topping
While the base is baking, stir 1 tablespoon of brown sugar into the remaining shortbread mixture. This little addition gives the topping extra crunch and a hint of caramel flavor. Set aside.
6. Add the Cherry Layer
Once the crust is out of the oven, spoon the cherry mixture evenly over the top. If there’s a lot of extra liquid at the bottom of the bowl, leave it behind—too much juice can make the bars soggy. Spread the cherries into an even layer, making sure they reach the edges.
7. Add the Crumb Topping
Sprinkle the reserved crumb mixture evenly over the cherries. You can keep the crumbles small for a finer texture or press some together for chunkier clusters.
8. Bake Until Golden
Return the pan to the oven and bake for another 25–30 minutes, or until the topping is golden and you can see some of the cherry filling bubbling through. The bubbling indicates that the filling has thickened properly.
9. Cool Completely Before Slicing
This step is crucial! Let the bars cool completely in the pan before slicing. If you cut too soon, the filling will be too soft and messy. Cooling allows the cherry layer to set, making clean squares much easier. For best results, chill in the fridge for an hour before slicing.
Serving Suggestions
- Enjoy cold from the fridge for a refreshing treat.
- Serve warm with a scoop of vanilla ice cream or whipped cream.
- Pair with a morning latte or cup of tea for a sweet breakfast bite.
- Dust with powdered sugar for an extra-pretty finish.
Storage Instructions
- Room Temperature: Store in an airtight container for up to 2 days.
- Refrigerator: Keeps well for up to 5 days.
- Freezer: Wrap individual bars tightly and freeze for up to 2 months. Thaw in the fridge before serving.
Variations
- Sour Cherry Bars – Use sour cherries and increase sugar in the filling to 3 tablespoons.
- Berry Mix – Replace half the cherries with blueberries or raspberries for a mixed-berry version.
- Almond Twist – Add 1/2 teaspoon almond extract to the filling and sprinkle sliced almonds on top before baking.
- Gluten-Free – Swap the flour for a 1:1 gluten-free blend.
Tips for Success
- Always measure cherries after pitting and chopping.
- For clean slices, chill the bars and use a sharp knife. Wipe between cuts for perfect edges.
- Don’t skip the parchment paper—it makes lifting and slicing much easier.
FAQs
Can I use frozen cherries?
Yes, just thaw them first and drain off excess liquid.
Do I need to peel the cherries?
No, the skins soften while baking and add flavor.
Can I make these ahead?
Absolutely—they taste even better the next day once the flavors meld.
Can I double the recipe?
Yes, just use a 9×13-inch pan and increase the baking time slightly.
Nutrition (per bar, approx.)
- Calories: 240
- Protein: 3g
- Carbs: 35g
- Fat: 11g
Conclusion
These Cherry Crumb Bars are the perfect mix of buttery, fruity, and crisp. They’re simple enough to whip up on a weeknight yet impressive enough to bring to a gathering. With their beautiful layers and fresh cherry flavor, they capture the taste of summer in every bite. Whether you stick with sweet cherries or experiment with tart ones, this recipe is sure to become a seasonal favorite.

Hey there! I’m Steffan, the food lover and creator behind Biteblis.com. Thank you for stopping by! I hope you’ll explore, get inspired, and find something delicious to cook up at home. My mission is simple: to spread joy through food, one tasty bite at a time. For more info, visit About Us.