
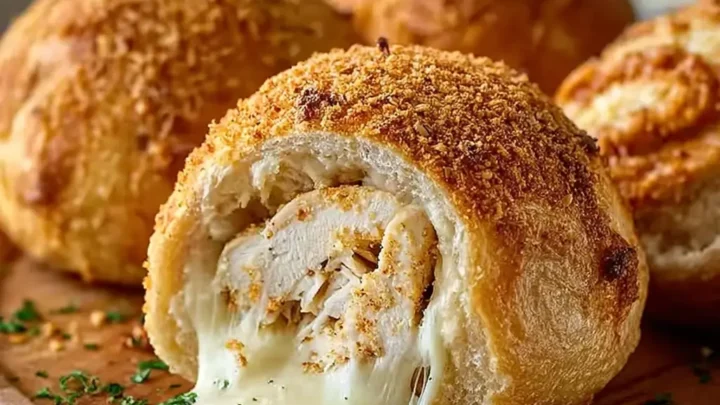
There’s something magical about comfort food that combines crispy, golden pastry with a creamy, savory filling—and these Chicken Pillows with Creamy Parmesan Sauce deliver exactly that.
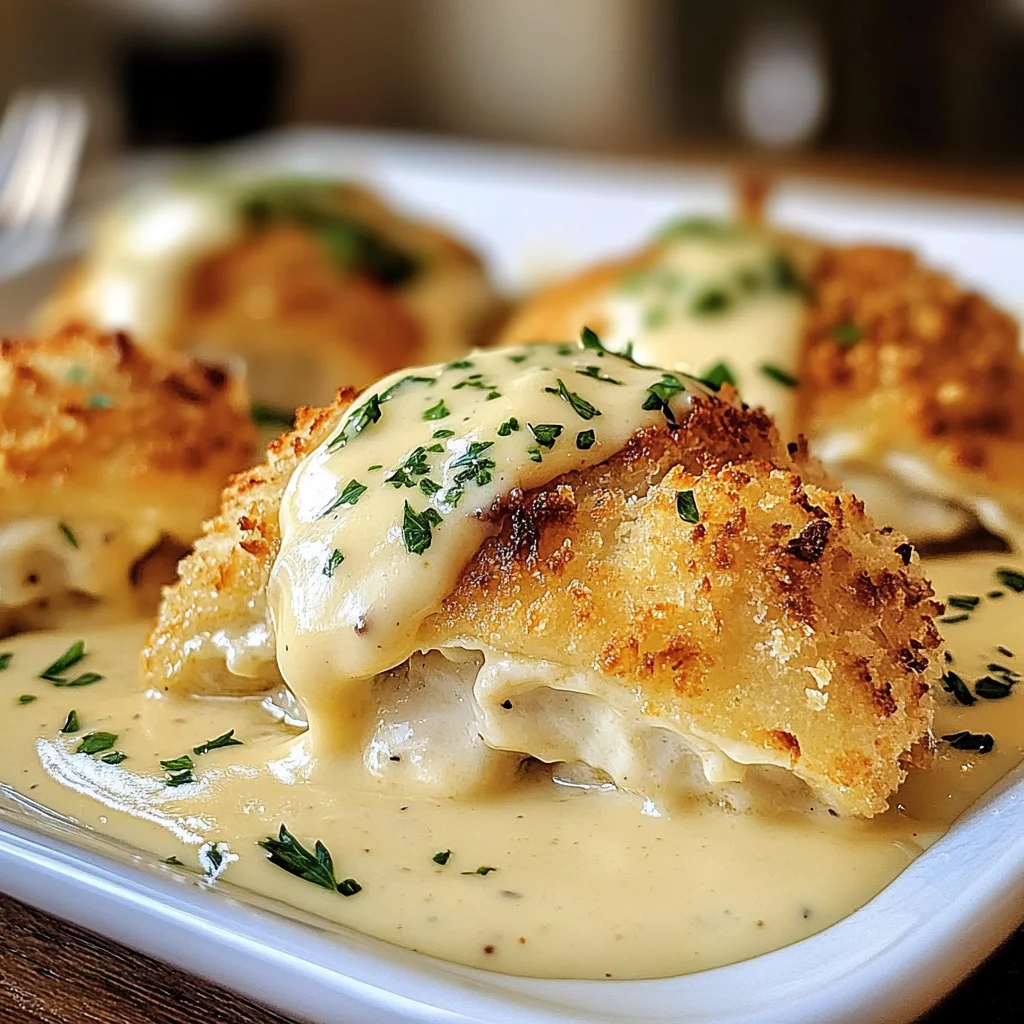
Each flaky crescent roll pocket is stuffed with tender chicken and a cream cheese mixture that’s seasoned just right, then topped with a rich and velvety Parmesan sauce. The end result is a dish that feels both cozy and indulgent, perfect for family dinners, potlucks, or even special gatherings.
What makes these chicken pillows so versatile is how easily they adapt. You can prepare them casserole-style for a hearty main dish, shape them into mini versions for appetizers, or serve them with sides for a well-rounded meal.
They’re easy enough for weeknights but impressive enough to serve guests, making them a recipe you’ll want to keep on repeat.
My Opinion
I have to admit, these chicken pillows quickly became one of my family’s favorite dinners. The first time I made them, I was surprised by how simple they were to prepare, yet how impressive they looked once baked.
The flaky crescent dough puffed up beautifully, sealing in that creamy chicken filling, and the Parmesan sauce was the perfect finishing touch. It gave the dish a comforting richness that made it feel like restaurant-quality comfort food right at home.
What I really love about this recipe is the balance—it’s indulgent without being over the top. The filling is creamy but not too heavy, the pastry is crisp but buttery, and the sauce ties it all together.
Paired with a crisp green salad or roasted vegetables, it makes a cozy yet complete meal. Honestly, these chicken pillows are the kind of dish that you’ll make once and immediately plan to make again.
Why You’ll Love This Recipe
- 🥐 Comfort food made easy – Flaky crescent rolls filled with creamy chicken goodness.
- 🍗 Perfect use for leftovers – Rotisserie or leftover chicken works beautifully.
- 👨👩👧 Family-friendly – Kids and adults both love the creamy filling and flaky crust.
- 🧀 That sauce! – A luscious Parmesan cream sauce takes it to the next level.
- 🎉 Versatile serving options – Great as a main dish, appetizers, or even casserole-style.
- 🕒 Weeknight-ready – Simple ingredients and straightforward prep.
Tools You’ll Need
- Mixing bowls (large and medium)
- Wooden spoon or spatula
- Pastry brush (for egg wash)
- Sharp knife or kitchen shears (for shredding chicken if needed)
- Baking sheet lined with parchment paper
- Saucepan and whisk (for Parmesan sauce)
- Measuring cups and spoons
- Optional: Rolling pin (to slightly flatten dough triangles)
Ingredients
For the Filling
- 2 cups cooked and shredded chicken (rotisserie or leftovers work well)
- 8 oz cream cheese (softened to room temperature)
- 1 teaspoon garlic powder
- 1 teaspoon onion powder
- 1 teaspoon dried parsley (or 1 tablespoon fresh parsley, chopped)
- 1/2 teaspoon salt (adjust to taste)
- 1/4 teaspoon black pepper
- 2 tablespoons melted butter
- 2 cans crescent roll dough
- 1 beaten egg (for egg wash)
- 1/4 cup panko breadcrumbs (optional, for topping)
For the Creamy Parmesan Sauce
- 3 tablespoons butter
- 3 tablespoons all-purpose flour
- 1 1/2 cups whole milk
- 1/2 cup heavy cream
- 1 cup grated Parmesan cheese
- 1/2 teaspoon garlic powder
- Salt and black pepper, to taste
Step-by-Step Instructions
Step 1: Preheat and Prepare
Preheat your oven to 375°F (190°C). Line a baking sheet with parchment paper so the pillows won’t stick and will brown evenly.
Step 2: Make the Filling
In a large bowl, combine the shredded chicken, softened cream cheese, garlic powder, onion powder, parsley, salt, pepper, and melted butter. Mix until smooth and creamy. The filling should be evenly blended so every bite has the same delicious flavor.
Step 3: Prepare the Dough
Unroll the crescent roll dough and separate it into individual triangles. If needed, use a rolling pin to slightly flatten them for easier filling. Keep dough chilled until ready to work with—it’s easier to handle when cold.
Step 4: Fill and Seal the Pillows
Place a generous spoonful of filling into the center of each dough triangle. Fold the corners over the filling and pinch the seams tightly to seal. This step is important to prevent leaks during baking.
Step 5: Egg Wash and Topping
Brush the tops of each pillow with the beaten egg to give them a beautiful golden shine. For extra crunch, sprinkle panko breadcrumbs over the top before baking.
Step 6: Bake
Place the pillows on the prepared baking sheet and bake for 20–25 minutes, or until puffed and golden brown. Keep an eye on them in the final minutes to avoid overbaking.
Step 7: Make the Parmesan Sauce
While the pillows bake, prepare the sauce. In a saucepan over medium heat, melt the butter. Whisk in flour to form a roux and cook for 1–2 minutes. Slowly add the milk and cream, whisking constantly to avoid lumps. Let the mixture simmer until slightly thickened, about 5–7 minutes. Stir in Parmesan cheese, garlic powder, salt, and pepper until smooth and creamy.
Step 8: Serve
Once the chicken pillows are baked, drizzle them generously with the creamy Parmesan sauce. Serve hot and enjoy the contrast of flaky pastry, creamy filling, and velvety sauce.
Storage Tips
- Refrigerator: Store baked pillows in an airtight container for up to 3 days. Reheat at 350°F (175°C) until warmed through.
- Freezer (Unbaked): Assemble pillows, freeze on a tray until solid, then store in a container for up to 2 months. Bake from frozen at 375°F for an extra 5–10 minutes.
- Freezer (Baked): Store cooled pillows in a freezer-safe container. Reheat in the oven until hot and crispy.
Expert Tips
- ✅ Use room temperature cream cheese for a smooth, lump-free filling.
- ✅ Don’t overfill the pillows—too much filling may cause leaks.
- ✅ Keep dough chilled while working with it for easier handling.
- ✅ Whisk Parmesan sauce continuously for a silky, lump-free texture.
- ✅ Brush with egg wash just before baking for that bakery-style golden finish.
Variations
- Mini Appetizers – Cut dough into smaller pieces for bite-sized party snacks.
- Casserole Style – Place filled pillows in a baking dish, pour sauce over them, and bake together for a creamy, comforting casserole.
- Herb Twist – Add fresh thyme or rosemary to the filling for a fragrant touch.
- Spicy Kick – Mix red pepper flakes or diced jalapeños into the filling.
- Veggie Boost – Add sautéed mushrooms, spinach, or bell peppers to the chicken mixture.
- Cheese Lovers’ Version – Mix mozzarella or cheddar into the filling for extra gooeyness.
Serving Suggestions
Pair these chicken pillows with sides that balance the richness of the dish:
- Garlic butter green beans
- Roasted seasonal vegetables
- Crisp garden salad with vinaigrette
- Creamy mashed potatoes
- Buttered corn on the cob
- Cheesy garlic bread (perfect for soaking up extra sauce!)
- Glass of chilled Chardonnay or sparkling water with lemon
- Light chocolate mousse or fruit tart for dessert
FAQs
What’s the best chicken to use?
Rotisserie chicken is the easiest and most flavorful option, but leftover roasted or grilled chicken works well too.
Can I make these ahead of time?
Yes! Assemble up to 3 days ahead and refrigerate, or freeze unbaked pillows for up to 2 months.
What if my sauce turns lumpy?
Remove from heat and whisk vigorously. If lumps remain, use an immersion blender to smooth it out. Prevent lumps by whisking continuously while adding liquid.
How do I know the pillows are done?
They should be golden brown, puffed, and slightly firm to the touch. Start checking around 18 minutes.
Can I make this gluten-free?
Yes! Use gluten-free pastry dough and substitute gluten-free flour for the sauce roux.
Chicken Pillows with Creamy Parmesan Sauce
Ingredients
Equipment
Method
- Step 1: Preheat and Prepare.Preheat your oven to 375°F (190°C). Line a baking sheet with parchment paper so the pillows won’t stick and will brown evenly.
- Step 2: Make the Filling.In a large bowl, combine the shredded chicken, softened cream cheese, garlic powder, onion powder, parsley, salt, pepper, and melted butter. Mix until smooth and creamy. The filling should be evenly blended so every bite has the same delicious flavor.
- Step 3: Prepare the Dough.Unroll the crescent roll dough and separate it into individual triangles. If needed, use a rolling pin to slightly flatten them for easier filling. Keep dough chilled until ready to work with—it’s easier to handle when cold.
- Step 4: Fill and Seal the Pillows.Place a generous spoonful of filling into the center of each dough triangle. Fold the corners over the filling and pinch the seams tightly to seal. This step is important to prevent leaks during baking.
- Step 5: Egg Wash and Topping.Brush the tops of each pillow with the beaten egg to give them a beautiful golden shine. For extra crunch, sprinkle panko breadcrumbs over the top before baking.
- Step 6: Bake.Place the pillows on the prepared baking sheet and bake for 20–25 minutes, or until puffed and golden brown. Keep an eye on them in the final minutes to avoid overbaking.
- Step 7: Make the Parmesan Sauce.While the pillows bake, prepare the sauce. In a saucepan over medium heat, melt the butter. Whisk in flour to form a roux and cook for 1–2 minutes. Slowly add the milk and cream, whisking constantly to avoid lumps. Let the mixture simmer until slightly thickened, about 5–7 minutes. Stir in Parmesan cheese, garlic powder, salt, and pepper until smooth and creamy.
- Step 8: Serve.Once the chicken pillows are baked, drizzle them generously with the creamy Parmesan sauce. Serve hot and enjoy the contrast of flaky pastry, creamy filling, and velvety sauce.
Notes

Hey there! I’m Steffan, the food lover and creator behind Biteblis.com. Thank you for stopping by! I hope you’ll explore, get inspired, and find something delicious to cook up at home. My mission is simple: to spread joy through food, one tasty bite at a time. For more info, visit About Us.