
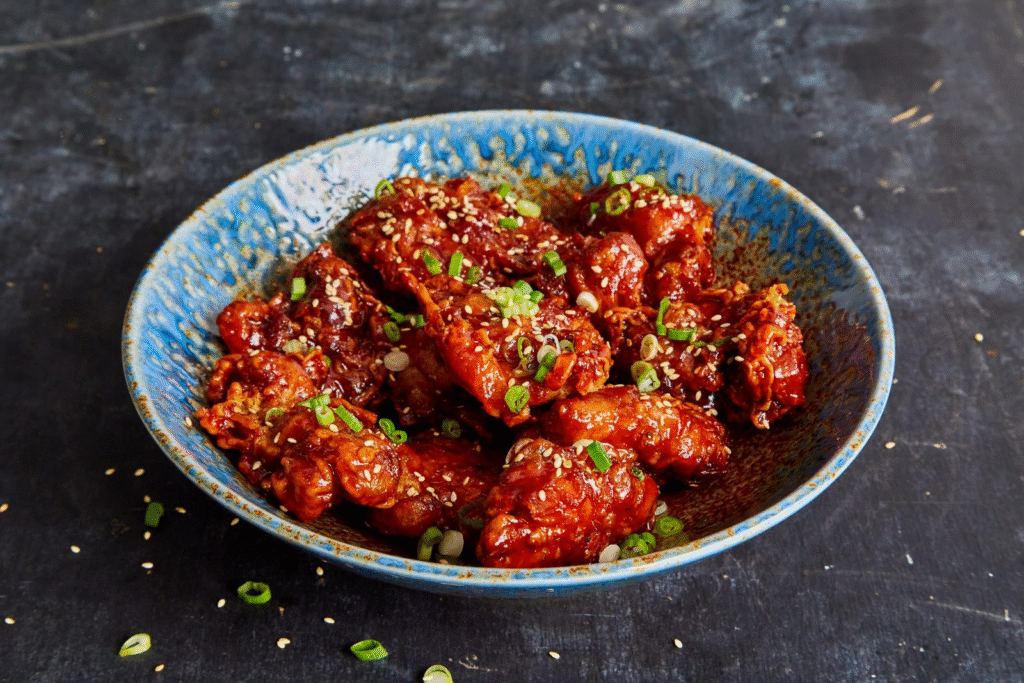
When it comes to crispy fried chicken, few things can compete with Korean-style fried chicken. This Soy Garlic Korean Fried Chicken, or dakgangjeong, is shatteringly crisp on the outside, tender and juicy on the inside, and coated in a sticky soy-garlic glaze that’s equal parts savory, sweet, and addictive.
Each bite delivers crunch followed by a burst of garlicky-sweet flavor that will have everyone reaching for seconds (and thirds!).
This recipe captures that iconic restaurant-style crunch by double-frying the chicken and finishing it with a glossy glaze that clings perfectly without making it soggy.
Whether you serve it as a party appetizer, a game-day snack, or a family dinner, it’s guaranteed to be a showstopper.
My Opinion
Making this Soy Garlic Korean Fried Chicken at home was one of the most rewarding cooking experiences I’ve had. From the first crackle of the chicken hitting the hot oil to the final glossy toss in the glaze, the entire process felt exciting.

The first bite blew me away — ultra-crunchy coating, juicy meat, and the perfect balance of sweet and salty flavors in the sauce. It’s truly restaurant-quality fried chicken right from my own kitchen.
What I loved most was how the double-fry technique transformed the texture. Even after sitting out for a bit, the chicken stayed crispy, which is a huge win when feeding a crowd.
The sauce, though sticky, didn’t weigh down the coating — instead, it made the chicken even more irresistible. Honestly, it’s hard to stop at one piece. This recipe is a keeper and one I’ll happily make again and again.
Why You’ll Love This Recipe
- ✅ Ultra-Crispy: Potato starch + double frying = unbeatable crunch that lasts.
- ✅ Juicy Inside: Chicken stays tender and moist thanks to the quick fry technique.
- ✅ Sweet & Savory Sauce: Balanced glaze with soy, garlic, honey, and mirin.
- ✅ Crowd-Pleaser: Perfect for game nights, parties, or family-style dinners.
- ✅ Customizable: Swap sauces or adjust sweetness to suit your taste.
Tools You’ll Need
- Large mixing bowls (for marinade and dredge)
- Whisk and spatula
- Tongs (for frying and tossing)
- Wok or deep pot (for frying)
- Skimmer or slotted spoon (to remove fried bits from oil)
- Wire rack or paper towel-lined tray (for draining fried chicken)
- Small skillet or pan (for making sauce)
- Thermometer (optional, but helps check oil temperature)
Ingredients
For the Marinade:
- 3 lbs chicken wings (or boneless thighs, cut into 2-inch pieces)
- 5 garlic cloves, minced
- 1 teaspoon fresh ginger, grated
- 2 tablespoons soy sauce
- 2 tablespoons mirin
- ¼ teaspoon black pepper
For the Sauce:
- 3 ½ tablespoons soy sauce
- 3 ½ tablespoons mirin
- 3 ½ tablespoons brown sugar
- 3 ½ tablespoons honey
- 3 tablespoons water
- 2 tablespoons rice vinegar
- 3 ½ teaspoons sesame oil
- 10 garlic cloves, minced
- 2 teaspoons fresh ginger, grated
For the Dredge:
- 1 ¼ cups potato starch (preferred; cornstarch as backup)
- 1 tablespoon garlic powder
- ¼ teaspoon baking powder
- 1 teaspoon onion powder
- ⅛ teaspoon black pepper
- 3 tablespoons water
For the Coating:
- 1 egg
- 3 tablespoons all-purpose flour (or cornstarch)
Instructions
- Marinate the Chicken
In a large bowl, combine chicken wings with minced garlic, grated ginger, soy sauce, mirin, and black pepper. Massage the marinade into the chicken to coat evenly. Cover and refrigerate for at least 30 minutes, or overnight for deeper flavor. Keep the chicken cold until ready to dredge—this step ensures maximum crunch when frying. - Prepare the Sauce
In a small bowl, whisk together soy sauce, mirin, brown sugar, honey, water, rice vinegar, and sesame oil. Set aside. This will later be simmered into a sticky glaze. - Make the Dredge
In a separate bowl, mix potato starch, garlic powder, baking powder, onion powder, and black pepper. Drizzle in a few tablespoons of water and use your fingers to create small crumbles in the starch mixture. These “nuggets” help form the crunchy coating. - Coat the Chicken
To the marinated chicken, add the egg and flour, mixing until just combined. Working in small batches, press each piece of chicken into the dredge, ensuring the coating adheres well. Shake off excess starch and let the coated chicken rest for 10–15 minutes. This helps the coating bind firmly to the chicken. - First Fry
Heat enough oil in a wok or deep pot over medium-high heat. To test if it’s ready, dip a wooden chopstick or spoon into the oil—if it sizzles, it’s hot enough. Fry chicken in batches for 3–5 minutes, stirring gently to prevent sticking, until golden brown and bubbling slows down. Remove and drain on a wire rack or paper towel-lined tray. Let rest for 5–10 minutes. - Second Fry
Reheat the oil to medium-high. Fry the chicken again, in batches, for 1–2 minutes until the coating turns darker golden and ultra-crispy. Drain once more on a wire rack. This double-fry method locks in crispiness that lasts for hours. - Make the Sauce
In a clean skillet, heat a splash of oil over medium heat. Add minced garlic and grated ginger, cooking just until fragrant (about 30 seconds). Pour in the prepared sauce mixture and simmer for 2–3 minutes, stirring constantly until it thickens into a sticky glaze. If it gets too thick, add a splash of water to adjust. - Toss and Serve
Add the fried chicken to the skillet and toss quickly until coated in the glossy glaze. Don’t worry if the sauce looks light—it’s meant to glaze, not soak. Garnish with toasted sesame seeds and sliced green onions if desired. Serve hot and crispy.
Variations
- Spicy Kick: Add gochujang (Korean chili paste) to the sauce for heat.
- Sweeter Glaze: Increase honey for a stickier, sweeter finish.
- Boneless Option: Use chicken thighs for a less messy, juicier bite.
- Alternative Dredge: For a lighter crunch, swap potato starch for cornstarch (though less crispy).
Key Tips
- Keep chicken cold before frying—cold chicken + hot oil = crunchiest crust.
- Rest dredged chicken before frying to help coating stick firmly.
- Double-fry for maximum crispiness that doesn’t fade quickly.
- Stir sauce constantly while simmering to prevent sugar from burning.
- Toss chicken in glaze lightly—don’t soak, or it’ll lose crispiness.
FAQs
How do I store and reheat Korean Fried Chicken?
Store leftovers in an airtight container in the fridge for up to 2 days. Reheat in an air fryer or oven at 375°F (190°C) for 8–10 minutes to revive crispiness. Avoid microwaving, as it will make the coating soggy.
What can I do with leftover frying oil?
Let oil cool completely, strain it to remove bits, and store in a sealed container for reuse (up to 2–3 times). Alternatively, dispose of it safely—never pour down the sink.
Can I make the sauce ahead of time?
Yes! Prepare and refrigerate the sauce for up to 3 days. Gently reheat and toss with freshly fried chicken.
Conclusion
This Soy Garlic Korean Fried Chicken is everything you want in comfort food: crunchy, juicy, sticky, and bursting with flavor.
The double-frying technique ensures the coating stays crisp, while the sweet-savory glaze adds that irresistible Korean-style flair.
Whether you’re hosting friends, enjoying a family dinner, or just craving fried chicken done right, this recipe is a guaranteed hit.
Category: Appetizer, Snack, Dinner, Korean Cuisine

Soy Garlic Korean Fried Chicken (Dakgangjeong)
Ingredients
Equipment
Method
- Marinate the Chicken.In a large bowl, combine chicken wings with minced garlic, grated ginger, soy sauce, mirin, and black pepper. Massage the marinade into the chicken to coat evenly. Cover and refrigerate for at least 30 minutes, or overnight for deeper flavor. Keep the chicken cold until ready to dredge—this step ensures maximum crunch when frying.
- Prepare the Sauce.In a small bowl, whisk together soy sauce, mirin, brown sugar, honey, water, rice vinegar, and sesame oil. Set aside. This will later be simmered into a sticky glaze.
- Make the Dredge.In a separate bowl, mix potato starch, garlic powder, baking powder, onion powder, and black pepper. Drizzle in a few tablespoons of water and use your fingers to create small crumbles in the starch mixture. These “nuggets” help form the crunchy coating.
- Coat the Chicken.To the marinated chicken, add the egg and flour, mixing until just combined. Working in small batches, press each piece of chicken into the dredge, ensuring the coating adheres well. Shake off excess starch and let the coated chicken rest for 10–15 minutes. This helps the coating bind firmly to the chicken.
- First Fry.Heat enough oil in a wok or deep pot over medium-high heat. To test if it’s ready, dip a wooden chopstick or spoon into the oil—if it sizzles, it’s hot enough. Fry chicken in batches for 3–5 minutes, stirring gently to prevent sticking, until golden brown and bubbling slows down. Remove and drain on a wire rack or paper towel-lined tray. Let rest for 5–10 minutes.
- Second Fry.Reheat the oil to medium-high. Fry the chicken again, in batches, for 1–2 minutes until the coating turns darker golden and ultra-crispy. Drain once more on a wire rack. This double-fry method locks in crispiness that lasts for hours.
- Make the Sauce.In a clean skillet, heat a splash of oil over medium heat. Add minced garlic and grated ginger, cooking just until fragrant (about 30 seconds). Pour in the prepared sauce mixture and simmer for 2–3 minutes, stirring constantly until it thickens into a sticky glaze. If it gets too thick, add a splash of water to adjust.
- Toss and Serve.Add the fried chicken to the skillet and toss quickly until coated in the glossy glaze. Don’t worry if the sauce looks light—it’s meant to glaze, not soak. Garnish with toasted sesame seeds and sliced green onions if desired. Serve hot and crispy.
Notes

Hey there! I’m Steffan, the food lover and creator behind Biteblis.com. Thank you for stopping by! I hope you’ll explore, get inspired, and find something delicious to cook up at home. My mission is simple: to spread joy through food, one tasty bite at a time. For more info, visit About Us.